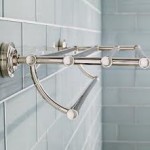
Towel rack installation in 5 easy steps

Freshen up the look of your bathroom with new fixtures.
Over the years and thousands of home inspections later, we are still intrigued by the homes we see where just a little TLC would make a big difference in the sale of a home.
A little paint, new fixtures and lighting can go a long way in giving a room a fresh look. Bathrooms in particular are a great place to start where just a few touches can really transform a tired room into looking fresh again.
Unfortunately, if you have a tiled bathroom wall, replacing the towel racks and tissue holders can seem a little daunting. After all, drilling holes into ceramic tile is not the easiest thing to do and then, there’s always the risk of cracking the tile.
Here are five simple steps to beating back those fears and installing a new towel rack or tissue holder on tiled walls.
Here’s what you will need:
- A new towel rack and tissue holder
- A tape measure
- A level
- Strong tape
- Silicone Caulk
Step 1
Position the rack at the most ideal location suitable for your needs. Mark the wall.
Step 2
Take the tape measure and measure the length of the towel rack and mark the location of each support on the wall. Place your level against the marks to be sure they are even.
Be sure the towel rack is located exactly where you want it, ensuring both ease of use and its position is pleasing to the eye and not out of place.
Now, double check the size of the towel rack and measurements you made on the wall just to be sure you measured and marked correctly.
Step 3
Clean the area where the first support will be attached with denatured alcohol. Next apply 100% silicone caulk on the back of the support and press into place on the wall. Be sure to press firmly and position it properly to the marks previously made. Secure the support in place with strong tape.
Allow it to cure a minimum of 12 hours.
Step 4
Clean the area where the second support will be attached with denatured alcohol. Apply the 100% silicone caulk to the back the support. BEFORE you press it into place, insert the towel bar into the first support and then into the second support. NOW, press the support firmly against the wall according to the markings previously made. It would also be a good idea to double-check the bar to be sure it is level at this point. Use the strong tape to hold the support in place.
Allow to cure for at least 12 hours before removing the tape.
Step 5
Finish with removal of the tape and application of a thin bead of caulk around the perimeter of each support base where they touch the wall. Smooth the caulk out with a wet finger of damp cloth. Again, allow it to cure for at least 12 hours and you’re good to go!!


