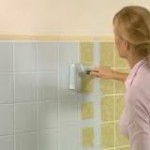
Painting ceramic tile can give a room a fresh look.
Over the years, we have heard many a client lament the outdated tile in a bathroom, kitchen or utility room.
Ceramic tile is a highly durable material when properly installed and maintained. Unfortunately, the colors and designs are not always so enduring.
Many believe the only way to properly deal with unwanted tile is to remove it. Without a doubt, removal and installing a new tile or surface is probably the best approach, but it is not always the most practical or cost effective.
If you are on a budget or just don’t want to deal with a major renovation right away, try painting the tile. If it is done properly, you can achieve a fresh color design at a fraction of the cost of new tile.
Here’s a step by step guide to a new look:
A few pointers before you start
Avoid painting tile that is located in areas prone to moisture or water. If you have unwanted tile in a shower or tub area, the best course of action in this area may be a tub or shower surround, installed directly over the tile (if it is in good and sound condition).
Understand that surface preparation is everything. You may want to rush the prep work with an ‘oh, it’s good enough’, DON’T!; instead focus as much energy and time as necessary to properly prepare the surface to receive a new coating of paint and you will improve your chances of a successful result dramatically.
Step 1
Clean the grout with a 3:1 solution of water and household bleach. Use appropriately rated gloves, safety glasses and skin protection. Also open windows to provide for adequate ventilation.
Scrub the grout with an old toothbrush or scouring pad. Take pains to remove all mildew/mold, grease, grime and dirt from the grout.
Allow the solution to sit on the material for about 15 minutes then rinse off with clean water.
Step 2
Next, clean the tile surfaces using a 50/50 solution of household ammonia and water. Again, ensure you are using appropriately rated gloves, safety glasses and skin protection. Keep windows open to help provide for adequate ventilation.
Using a sponge or scouring pad, remove all soap scum, residue, grease and grime from the surfaces. Rinse well with water. Dry the surface using a towel.
Step 3
Lightly scuff tiles with fine sand paper.
Step 4
Repair loose and missing grout, cracks and surface damage.
Step 5
Tape off all areas you don’t want to paint. Also remove any hardware or items attached to the surface for ease in paint application.
Step 6
Apply an epoxy or bonding primer such as Zinsser’s BIN, paying careful attention to the application instructions.
Step 7
Select a semi-gloss or gloss paint finish and apply per directions on the can.
Step 8
Allow the paint to dry for 2-3 days then apply several coats of water based clear urethane to help guard against moisture, scrubbing and general wear and tear.
__________________________________________________________________
Lawrence Watkins is a NYS Licensed Home Inspector and the President of Specsure Property Inspections. As a leading full service residential home inspection and commercial property inspection company proudly serving Buffalo, Lewiston, Orchard Park and all of Western New York (WNY) for over 20 years, we are pleased to provide timely and simple DIY tips and hints for today’s homeowner.
For more information you can reach us at 716-881-1914 or via email at info@specsure.com.


